ENZYME user manual
A dynamic resonance suppressor. It finds the narrow peaks that stick out above their own surroundings — room resonance, snare ring, a boxy note on an acoustic guitar — and pulls them down per frequency bin, per frame. A static notch would thin out everything else living at that frequency. This does not.
01What ENZYME does
An EQ decides on frequency. A compressor decides on level. ENZYME decides on protrusion — how far a bin sticks up above the spectrum immediately around it.
The problem it is built for is the one where you can hear exactly which frequency is wrong, but notching it costs you everything else that lives there. A 380 Hz ring on a vocal is only a problem on the notes that excite it. Notch 380 Hz and you have also thinned every other note that passes through 380 Hz, for the whole take.
ENZYME works one frequency bin at a time, one frame at a time:
- A local baseline is estimated for every bin — a running mean, in the power domain, of the bins around it. That is the “spectrum immediately around” that bin.
- The excess over that baseline is what counts as resonance. A bin that is loud but no louder than its neighbours is music, not a peak, and is left alone.
- Attenuation is applied per bin, proportional to that excess and scaled by Depth. Nothing is ever boosted.
- The gain is smoothed across frequency and in time, so a cut fades in and out rather than chattering.
Because the threshold is relative to each bin’s own neighbourhood rather than a fixed level, the same setting keeps working as the material gets louder or quieter, and when the resonance moves it is followed rather than missed.
Every control in ENZYME either reduces level or shapes how much reduction happens. There is no make-up gain and no band that can add energy. If a mix gets brighter after ENZYME, it is because something masking the top end was removed.
02Install
macOS
Download the installer from the ENZYME download page and double-click it. The package is a Universal Binary — Apple Silicon and Intel in one file — and it is signed and notarized, so Gatekeeper lets it through without the right-click → Open workaround. All three formats install together:
| Format | Installed to | Used by |
|---|---|---|
| AUv2 | /Library/Audio/Plug-Ins/Components/ENZYME.component | Logic Pro, GarageBand |
| VST3 | /Library/Audio/Plug-Ins/VST3/ENZYME.vst3 | Live, Reaper, Bitwig, Studio One, Cubase |
| CLAP | /Library/Audio/Plug-Ins/CLAP/ENZYME.clap | Bitwig, Reaper |
The Audio Unit is a real AUv2 component, not a CLAP wrapped at runtime. That matters in Logic: the wrapper approach loses GUI input events under Logic’s out-of-process hosting.
Windows
Two builds are published — an installer (.exe) and a portable
(.zip). Both are on the same download page, which
offers the right one for the machine you visit from. VST3 and CLAP are installed; AUv2 is a
macOS-only format.
The Windows build is not code-signed yet, so SmartScreen warns on first run. Choose More info → Run anyway, or verify the published SHA-256 first if you would rather check before running it.
The download service serves only the current build and returns 404 for superseded versions, so a direct link to a specific installer filename stops working at the next release. Bookmark intrect.io/download/enzyme/ instead of the file itself.
03First run
- Insert ENZYME on the track or bus you want to treat. It is an insert effect, not a send — the whole signal has to pass through it.
- Play the passage where the problem is worst. Not the quiet intro — the note or hit that makes you reach for the plug-in.
- Watch the reduction curve under the spectrum. That curve is the direct readout of what ENZYME is deciding right now, and it is the fastest way to learn every control in here.
- Raise Depth until the reduction curve dips where you expect it to. If it dips everywhere, Selectivity is too low.
- Press Delta. You now hear only what is being removed. If you hear the performance in there, back off.
The trial is a full-feature 14-day trial with no account and no email required — the plug-in requests it on first launch from the machine it is running on.
04The interface
Everything is on one panel. There are no pages to hunt through.
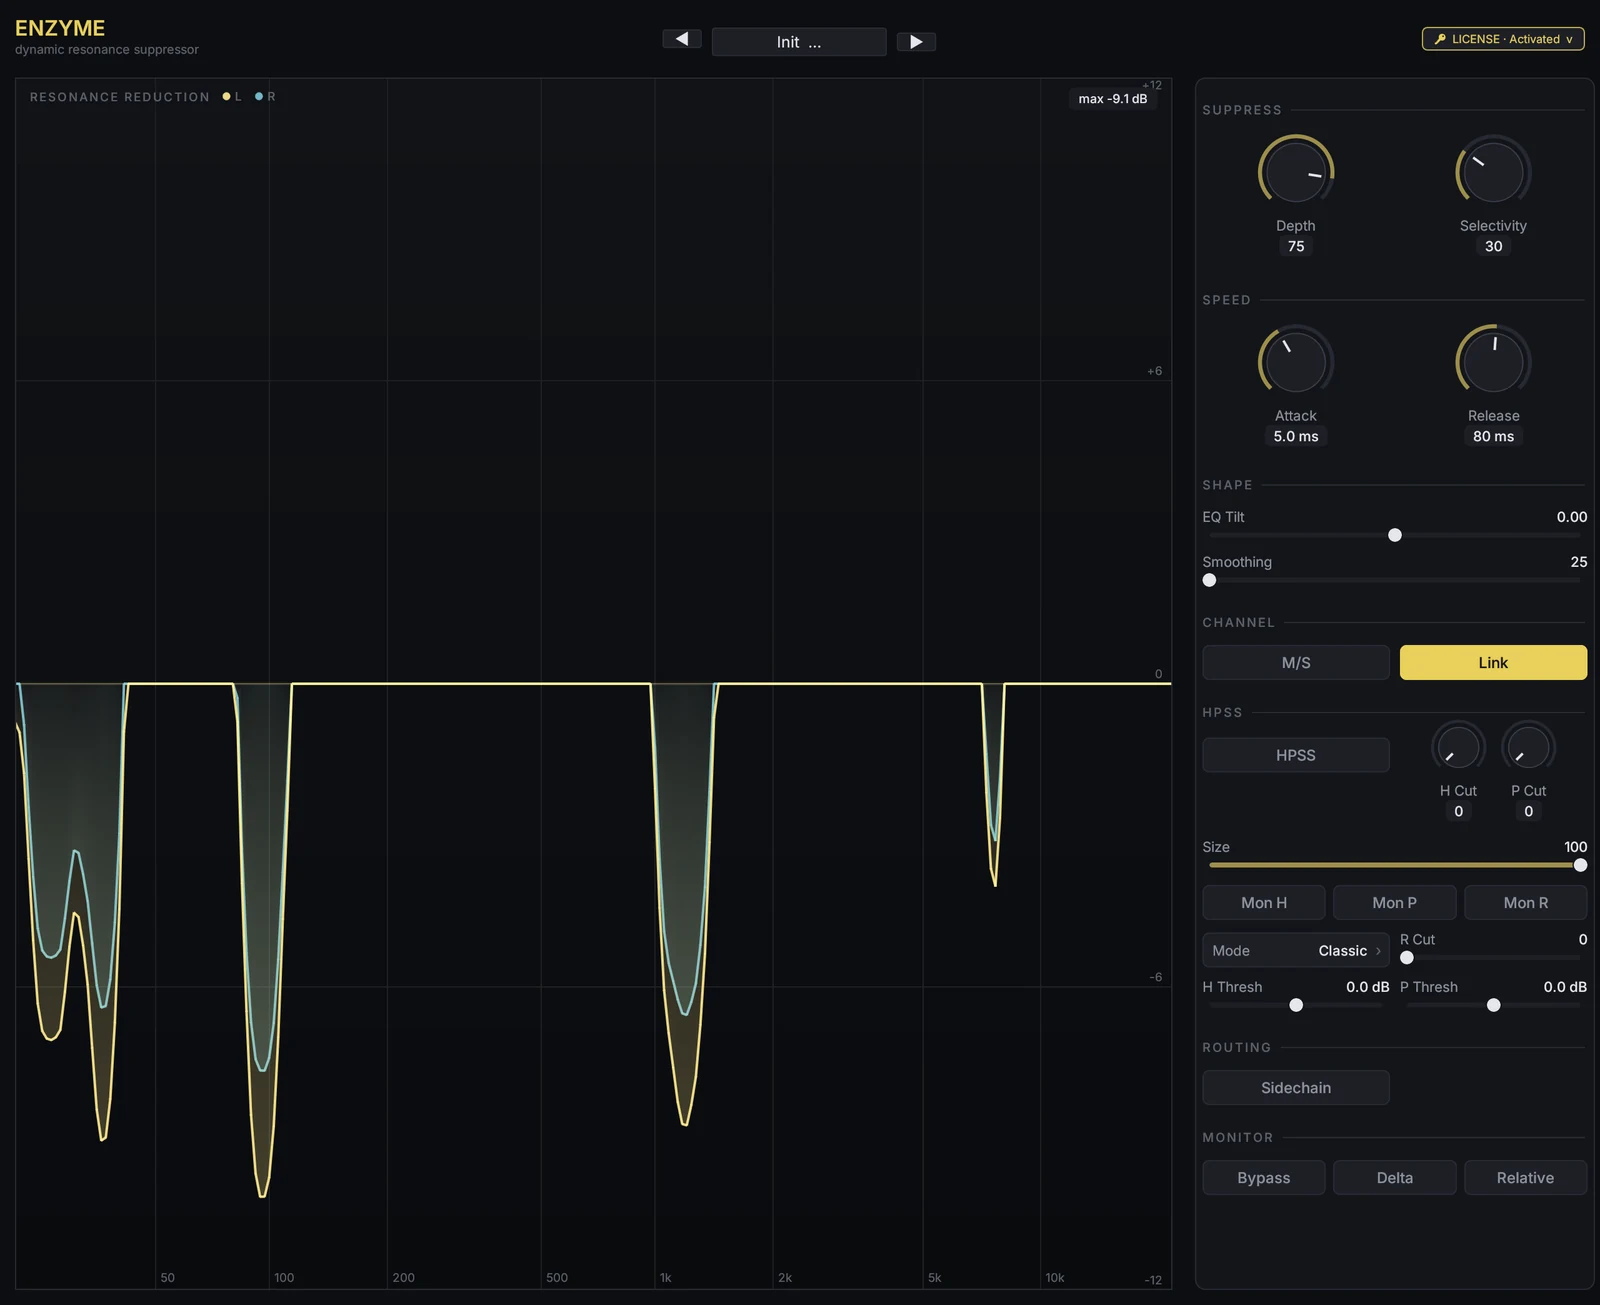
The spectrum is what is going in. The curve underneath it is the attenuation being applied per bin, right now.
The editor is a wgpu/Metal surface on a 1280×1044 canvas that scales to your display. The spectrum and the reduction curve are drawn live.
When you are learning a control, watch the reduction curve rather than the spectrum. The spectrum tells you what the material is doing; the curve tells you what ENZYME has decided about it, which is the thing your control changes.
05Quick start
Sixty seconds to a working setting on almost any source.
- Turn Relative on. The threshold now reads as a ratio above the local baseline, so the same protrusion gets the same treatment whatever the input level is.
- Set Selectivity high — around 70–80%. You are telling the detector that only sharp, narrow peaks count.
- Raise Depth from zero until the ring stops bothering you. Stop there. Depth is not a quality control; more is not better.
- If sustained notes warble, raise Release. If the cut arrives late and you hear the front of the ring, lower Attack.
- Press Delta and listen. You want to hear the resonance and almost nothing else. Anything musical in the Delta signal means Depth is too high or Selectivity too low.
06Core controls
| Control | Range | What it does |
|---|---|---|
| Depth | 0–100% | How much attenuation each unit of excess buys. 0 is transparent; 100 is maximum suppression. |
| Selectivity | 0–100% | Width of the kernel that estimates the local baseline. High values catch only sharp peaks; low values also treat broad humps as resonance. |
| Attack | 1-pole, default 5 ms | How fast the gain moves into a cut. |
| Release | 1-pole, default 80 ms | How fast the gain comes back out. Warbling on sustained notes means Release is too short. |
| Smoothing | 0–100% | Smooths the reduction mask along the frequency axis. Higher trades a little precision for less ringing. |
| EQ Tilt | ± | Biases the detector towards the low or high end, so one region gets worked harder than the other. |
| Relative | on / off | Reads the threshold as a linear ratio above the baseline instead of an absolute level. |
Depth and Selectivity are the two that matter
Think of Selectivity as the question and Depth as the answer. Selectivity decides what counts as a peak at all; Depth decides how hard the peaks that qualify get pushed down.
A common failure is reaching for more Depth when the real problem is that Selectivity is too low, so a broad, musical hump is being read as resonance and the whole region is being pulled down. If raising Depth makes the source sound smaller rather than cleaner, raise Selectivity and try again.
Attack and Release
These are the only controls that can make ENZYME audible as an effect rather than as an absence. Two symptoms tell you which one to move:
- Warbling or fluttering on sustained notes — the gain is coming back too quickly between frames. Raise Release.
- You still hear the first moment of the ring — the cut is arriving after the event that caused it. Lower Attack.
Very short Attack on percussive material can shave the leading edge of a transient. If a snare loses its snap, that is usually Attack rather than Depth.
Relative
Leave this on for most work. With Relative off, the detector compares against an absolute level, so a quiet verse and a loud chorus get different amounts of treatment even though the resonance is the same shape in both. With it on, the decision is scale-free.
07Channels: mono, stereo, M/S and sidechain
Mono and dual-mono
A mono instance is genuinely one channel in and one channel out. It is not a stereo instance fed the same signal twice, and Logic’s dual-mono is two separate mono instances rather than one linked pair.
The sidechain is mono too. The host negotiates a mono sidechain bus for a mono instance — nothing is summing a stereo sidechain down for you. Feed it a mono source.
Two controls below lose their meaning in mono, and the interface reflects that:
- M/S has nothing to encode. A mono path never goes through mid/side, so the spectrum legend does not offer M and S either.
- Link has nothing to link. There is one gain decision because there is one channel.
Everything else — the per-bin detector, the H/P/R stage, Delta, latency compensation — behaves exactly as it does in stereo.
The mono layout is in the current macOS build. The Windows build is a release behind and does not have it yet; check the download page for what each platform is on today.
Stereo
| Control | What it does |
|---|---|
| M/S | Detect in mid/side instead of left/right. |
| Link | Whether the two channels share one gain decision or move independently. |
| Sidechain | Drive detection from another source while the gain is applied to this one. |
Link on keeps the stereo image still: both channels get the same gain, so a cut cannot pull the image to one side. That is what you want on a mix bus.
Link off lets each channel be judged on its own. Use it when the problem genuinely lives on one side — a room mode that only one overhead hears, for instance. Expect a little image movement in exchange.
M/S is the tool for a resonance that sits in the centre of a mix while the sides are fine, or the reverse. Detecting in mid/side means the cut lands on the component that actually has the problem instead of on both.
Sidechain separates “what to look at” from “what to treat”. Feed it a copy of the source that shows the resonance most clearly — a close mic rather than a room mic, say — and the gain still lands on the track ENZYME is inserted on.
08The H / P / R stage
Optional, and the part no ordinary dynamic EQ gives you.
ENZYME can separate the signal into three components and attenuate each one on its own:
- H — harmonic. Sustained, pitched material. A ring, a held note, the tone of a drum shell after the hit.
- P — percussive. Transient, broadband material. The stick, the pick, the consonant.
- R — residual. Everything that is neither — noise, breath, room.
This is the same median-filter separation that backs Intrect’s offline separation work, running causally inside a real-time plug-in. Combined with per-bin suppression it means you can take the ring off a snare without touching the stick, or pull a resonance out of a sustained note while the transients around it stay intact.
| Control | Range | What it does |
|---|---|---|
| H Cut | attenuation | Pulls down the harmonic component only. |
| P Cut | attenuation | Pulls down the percussive component only. |
| R Cut | attenuation | Pulls down the residual component only. |
| Size | 7–31 bins | Median kernel width. Wider separation is cleaner but costs more CPU. |
| Classic / Coupled / Advanced | 3 modes | Mask formulation. Classic is the plain median split; Coupled and Advanced trade a little CPU for tighter component boundaries. |
| Mon H / P / R | solo | Solo one component to hear exactly what the separation is doing. |
How to use it
- Press Mon H and listen. You are hearing only the sustained, pitched part of the signal. On a snare this is the ring, almost isolated.
- Adjust Size until the component sounds cleanly separated. Wider kernels separate better and cost more; the full range stays under 3.3% of the hop budget, so this is rarely a real constraint on one instance.
- Release the Mon button, then raise H Cut until the ring sits where you want it.
- Check the transient is intact by soloing Mon P before and after.
A Mon button is still latched. The monitor buttons are sticky by design so you can walk away and come back to the same comparison — which also means it is the first thing to check when the plug-in suddenly sounds wrong.
09Delta and Bypass
Delta plays only what is being removed. It is the fastest way to catch over-processing, and it is worth using as a habit rather than a rescue: set the plug-in by ear, then press Delta and ask whether you would miss any of what you are hearing. Pitch, words and attack in the Delta signal all mean too much is coming out.
Bypass keeps latency compensation intact, so A/B stays phase-aligned. This is not true of every plug-in, and it is the difference between comparing two settings and comparing two settings plus a 46 ms shift. Delta and the H/P/R state changes hold the same guarantee — switching while playing does not move the signal.
10Presets
Factory presets install alongside your own. From the header you can load, save, rename, delete, import and export, with a category filter to narrow the list.
Import and export are ordinary files, so a preset can be sent to a collaborator or checked into a project folder with the session.
Presets are a starting point rather than an answer here. The resonance in your room is not the resonance in anyone else’s, and the two controls that matter most — Depth and Selectivity — depend on the source in front of you.
11Workflow recipes
Room resonance on a vocal or acoustic take
Relative on, Selectivity 70–80%, Release around 80–120 ms. Raise Depth until the bloom on the offending notes settles. The resonance only appears on certain notes, so the reduction curve should be still most of the time and dip on those notes — if it is permanently dipped, Selectivity is too low.
Snare ring
Enable the H/P/R stage and use H Cut. The ring is harmonic; the stick is percussive. Cutting the harmonic component reaches the ring without dulling the attack, which is what a gate or an EQ notch cannot do.
Boxy notes on an acoustic guitar
One or two notes on the neck jump forward. High Selectivity, moderate Depth. Per-frame detection means the rest of the performance keeps its body.
Sibilance that only bites sometimes
Narrow HF peaks on specific words. Use EQ Tilt towards the high end so the detector works the top harder, keep Selectivity high, and keep Depth modest. A broadband de-esser dulls the whole take; this follows the peak.
Harsh mix bus
Low Depth, high Selectivity, Link on. You are shaving accumulated peaks that nobody put there on purpose, not darkening the mix. If the bus sounds duller rather than smoother, Depth is too high.
Resonant synth and sampled material
Filter self-oscillation and sampler artefacts sit proud of the spectrum, and the detector does not care what made the peak. Treat as for boxy notes, and consider M/S if the resonance is centred.
12Latency & performance
ENZYME is causal — no lookahead beyond the analysis window — so live monitoring works. The dry path is delayed to match, which is what keeps Bypass and Delta honest.
Structural latency is NFFT − 1 = 2047 samples: about 46 ms at 44.1 kHz and 43 ms at 48 kHz. Your DAW compensates for it on playback. For tracking through the plug-in, that delay is real and you will want to monitor dry.
| Configuration | Median per frame | Share of hop budget |
|---|---|---|
| H/P/R off | 71.5 µs | 1.2% |
| Classic, kernel 31 | 169.6 µs | 2.9% |
| Coupled / Advanced, kernel 31 | 190.9–191.5 µs | 3.3% |
Apple Silicon release build, 44.1 kHz, median over 800 frames, measured 2026-07-27 on the 0.2.x DSP. “Budget” is the wall clock available per 256-sample hop. Kernel 31 is the widest separation available, so the last row is the worst case.
The DSP hot path adds no allocation and takes no locks; buffers are sized once at activation.
13Licence and trial
The trial is 14 days, full-feature, and needs no account and no email address. The plug-in asks for it on first launch and it is tied to the machine.
A purchased licence activates on up to 3 machines. Paste the key into the licence panel and press Activate. Inside a DAW, use the Paste button rather than typing — some hosts swallow keystrokes in plug-in text fields.
Keys look like INTRECT-ENZM-XXXX-XXXX-XXXX. They are not case-sensitive and the
dashes are part of the key.
14Troubleshooting
| Symptom | Cause and fix |
|---|---|
| Output sounds like one isolated element | A Mon H/P/R button is latched. Release it. |
| Sustained notes warble or flutter | Release is too short. Raise it. |
| Source sounds smaller, not cleaner | Selectivity is too low, so broad musical humps are being treated as peaks. Raise Selectivity before touching Depth. |
| Transients lose their snap | Attack is too short, or the percussive component is being cut. Lengthen Attack; check P Cut is where you meant it. |
| Stereo image shifts on cuts | Link is off. Turn it on for bus work. |
| M/S and Link do nothing | The instance is mono. Neither control has anything to act on there — this is expected, not a fault. |
| Sidechain seems to ignore one side | A mono instance negotiates a mono sidechain bus. Feed it a mono source rather than expecting a stereo pair to be summed. |
| Nothing happens at any Depth | Nothing in the material is protruding enough to qualify. Lower Selectivity, or check Relative. |
| A/B seems to shift the timing | It should not — Bypass is latency-compensated. If it does, the DAW’s delay compensation is off for that track. |
| Not in Logic’s plug-in list | Logic caches its AU scan. Quit Logic, reopen, and let the validation pass run. |
| Windows warns before it runs | SmartScreen, because the Windows build is not code-signed yet. More info → Run anyway. |
15Support
Open a ticket at intrect.io/support — that is the single channel, and it reaches a person. Include your DAW, its version, your OS, and whether the problem also happens with the H/P/R stage switched off. That last one narrows most reports in half.
Related reading: removing room resonance from vocals, killing snare ring without losing the crack, and the ENZYME product page.
Product details and community feedback on KVR Audio (opens in a new tab)
Want to check a track first? Free AI music detector — no account needed.